
Diving into DIY home automation systems is all about creating a smart home that's truly yours—powerful, private, and tailored to how you actually live. It's a leap beyond the scattered, off-the-shelf gadgets that often come with limitations. Instead of juggling a dozen different apps and trusting various cloud services, you're building a central "brain" for your home. This hub orchestrates everything from lights and thermostats to security sensors, all under your complete control. Not only does this save you money in the long run, but it also keeps your personal data right where it belongs: inside your own home.
Why Build Your Own Smart Home System
The idea of building a smart home from the ground up might sound a little daunting, but the payoff is massive and goes way beyond mere convenience. Commercial ecosystems like those from Amazon or Google often trap you in their walled gardens, limiting which devices you can use and funneling all your data through their corporate servers. Taking the DIY route flips that script entirely, putting you in charge.
The whole philosophy is about making your home work for you, not the other way around. You get to pick and choose which devices play together, how they react, and when they do it. This is a level of personalization that pre-packaged solutions just can't touch.
The Power of True Customization
Think beyond a basic "Good Morning" routine that just flicks on a few lights. In a custom-built system, that same routine could slowly fade your bedroom lights up to mimic the sunrise, nudge the thermostat a few degrees higher, kickstart the coffee maker, and start playing your favorite news podcast—all triggered the moment you turn off your alarm. That's the kind of seamless experience you can create.
You can design automations based on nearly any combination of triggers you can imagine. For instance, what if a window sensor sees it's open while the weather forecast calls for rain? Your system can instantly ping your phone. This detailed control is what turns a house full of smart gadgets into a genuinely intelligent home.
Unlocking Key Advantages
When you roll up your sleeves and go the DIY route, you gain some serious advantages over just buying a box off the shelf:
- Enhanced Privacy and Security: By using a local-control platform like Home Assistant, your data stays on your home network. You're not broadcasting your daily habits to a third-party server, which dramatically cuts down on privacy risks.
- Long-Term Cost Savings: Sure, there's an upfront cost for hardware like a Raspberry Pi and some sensors, but you get to dodge the monthly subscription fees that plague many commercial systems. Plus, you can mix and match devices from hundreds of manufacturers, letting you hunt for the best deals instead of being locked into one pricey brand.
- Limitless Interoperability: A DIY hub is the ultimate translator for your smart devices. It allows gadgets that were never meant to speak to each other to communicate perfectly. Your Zigbee motion sensor can trigger a Wi-Fi smart plug, which then tells your Z-Wave thermostat to adjust the heat.
As you weigh the benefits of a DIY system, it helps to understand the impact of individual components. For example, you can explore the benefits of smart thermostats and see how a single device can make a huge difference in both comfort and energy savings.
The real magic of DIY automation isn't just about making things "smart." It’s about solving the little, unique annoyances in your own daily life. It’s a fun, rewarding project that gives you ultimate control over your living space.
Choosing The Right Home Automation Platform
Picking your home automation platform is easily the single most important decision you'll make. This isn't just software; it's the central nervous system for your entire smart home. It's what will listen to your sensors, process your automations, and tell your lights, locks, and speakers what to do. The platform you choose will shape everything that follows, from device compatibility to how your private data is handled.
The good news is that if you're building a DIY home automation system, you've picked a great time to start. The market is absolutely booming, thanks to more affordable hardware and a massive surge in consumer interest. In fact, the DIY home automation market was valued at USD 50.46 billion in 2023 and is projected to hit an incredible USD 508.78 billion by 2032. As this DIY home automation market report shows, this is no longer a niche hobby—it’s a mainstream movement.
The Local Control vs. Cloud Debate
Your first big fork in the road is deciding between a system that runs locally inside your home versus one that depends on the cloud. This choice has massive implications for privacy and reliability.
A local-control platform, like Home Assistant, runs on a small computer on your network—think a Raspberry Pi or a mini PC. All your automations and personal data stay inside your house. If your internet goes down, your smart home doesn't skip a beat. Everything just keeps working.
Cloud-based systems, on the other hand, send your commands out to a remote server for processing. They can seem simpler to set up initially, but they come with serious trade-offs. An internet outage can bring your smart home to a grinding halt. More importantly, you're trusting a third party with your data. For any true DIYer focused on privacy and rock-solid reliability, local control is almost always the way to go.
Top Contenders In The DIY Space
When you look at powerful, local-first platforms, two names stand out from the crowd: Home Assistant and OpenHAB. Both are open-source, unbelievably powerful, and backed by huge, helpful communities of fellow enthusiasts.
- Home Assistant has become the crowd favorite, known for its polished, modern interface and incredibly fast development. It boasts an enormous library of "integrations," which means it works with thousands of devices right out of the box. Its visual automation editor is a game-changer, making it perfect for beginners who still want access to immense power under the hood.
Here’s a glimpse of the Home Assistant dashboard, where you can monitor and control everything in one place.
The real beauty here is that the layout is completely customizable. You can build screens tailored perfectly to how you want to run your home.
- OpenHAB is one of the original players and has a well-earned reputation for stability. It's built on Java and can feel a bit more technical, often requiring you to get your hands dirty with text-based configuration files. For those willing to climb the steeper learning curve, the payoff is an exceptionally robust and reliable system.
My personal take? For most people starting out today, Home Assistant is the clear winner. Its momentum, ease of use, and sheer breadth of device support make it the most accessible yet powerful choice for building a future-proof smart home.
Comparing Top DIY Home Automation Platforms
This table offers a head-to-head comparison of the leading DIY platforms to help you see where each one shines and find the best fit for your project.
| Platform | Best For | Technical Skill | Control Type | Key Advantage |
|---|---|---|---|---|
| Home Assistant | Most users, from beginners to power users. | Low to High | Local First | Massive device support & active community |
| OpenHAB | Technical users who value stability & control. | Medium to High | Local First | Mature architecture & extreme flexibility |
| SmartThings | Users who want a simple, appliance-like setup. | Low | Cloud-Hybrid | Easy setup with branded hardware |
| Hubitat | Those wanting local control in a pre-built box. | Low to Medium | Local First | All-in-one hardware and software |
Ultimately, the best platform is the one that aligns with your skills, your existing gear, and your long-term vision for your home.
How To Make Your Choice
Choosing the right platform is about more than just software. You’ll often need a dedicated hub to help translate signals between all your different devices. To get a handle on the hardware side of the equation, you should check out our deep dive on comparing different smart home hubs.
To zero in on the right platform for you, ask yourself these questions:
- What's my technical comfort level? Are you happy tinkering with text files and learning some code (OpenHAB), or do you want a more visual, guided experience (Home Assistant)?
- What smart devices do I already own? Take inventory of what you have. A quick search of each platform's "integrations" library will tell you how well-supported your gear is.
- What are my future ambitions? Are you just looking to automate a few lights? Or are you dreaming of a fully integrated system with security, climate control, and energy monitoring? Both platforms can scale, but Home Assistant's massive community often means new, creative integrations show up there first.
Assembling Your Smart Home Hardware
Alright, you've picked your platform—now for the fun part. It's time to start collecting the actual hardware that will bring your smart home vision to life. This is where you get hands-on, choosing the sensors that will be your home's eyes and ears, the actuators that will do the heavy lifting, and the central hub to tie it all together.
Don't feel like you need to buy everything at once. Most of us start with a few key pieces and build out the system over time as new ideas and needs pop up.
At the heart of almost every DIY home automation system is a small, low-power computer running 24/7. While an old laptop can work in a pinch, the Raspberry Pi is really the undisputed king here, and for good reason. It's cheap, surprisingly powerful, and backed by a massive community. This little board will be the brain of your entire operation.
Hubs, Sensors, and Actuators: The Building Blocks
Your smart home is built from three basic types of hardware. Getting your head around these categories makes planning your system so much easier.
-
Hubs and Coordinators: This is your command center. Your Raspberry Pi runs the software, but it can't speak Zigbee or Z-Wave out of the box. A USB coordinator stick plugs into your Pi, acting as a specialized radio antenna and translator for all your wireless devices.
-
Sensors: These are the devices that perceive the world. They feed data back to your hub about what's happening in and around your home. Think motion sensors, door and window contact sensors, and little multi-sensors that track temperature, humidity, and even light levels.
-
Actuators: These are the muscles. They receive commands from the hub and make something happen in the real world. The most common examples are smart plugs that control lamps, smart light bulbs, in-wall light switches, and automated door locks.
Feeling a bit lost in the sea of options? I get it. To cut through the noise, we've put together a list of reliable, well-supported gear in your guide to the best smart home devices.
Choosing Your Wireless Protocol: Zigbee vs. Z-Wave
Most of the battery-powered gadgets you'll use don't connect directly to your Wi-Fi. Instead, they rely on low-power mesh network protocols to save energy and extend range. The two big players you'll constantly see are Zigbee and Z-Wave. They do a similar job, but each has its own personality.
I've learned from experience that a mix-and-match approach is usually best. Zigbee is my go-to for things like motion and door sensors; it's fast, and the devices are incredibly affordable. But for mission-critical hardware like smart locks or main light switches, Z-Wave's legendary reliability and range give me more peace of mind.
Here’s a quick cheat sheet to help you decide what to look for:
| Protocol | Best For | Key Advantage | Common Devices |
|---|---|---|---|
| Zigbee | Battery-powered sensors and smart lighting. | Fast response times and lower cost. | Motion sensors, bulbs, contact sensors |
| Z-Wave | Critical devices like locks and switches. | Excellent reliability and signal range. | Smart locks, thermostats, wall switches |
| Wi-Fi | Devices that need high bandwidth. | No extra hub needed for direct connection. | Security cameras, smart speakers |
Just remember, a Zigbee device can only talk to other Zigbee devices (and the same for Z-Wave). That's why your central hub, armed with the right USB coordinators, is so crucial—it’s the universal translator that lets them all work together.
Smart Plugs and Energy Monitoring
If you're looking for the single most useful gadget to start with, grab a smart plug. These little devices are perfect for beginners because they require zero wiring. You just plug one into a wall outlet, plug a "dumb" appliance like a lamp or a fan into it, and you've instantly made it smart.
The real magic happens when you get a smart plug with built-in energy monitoring. This feature is a game-changer for any DIYer. It lets your system see exactly how much electricity an appliance is pulling. You can set up an automation to send you a phone alert when the washing machine is done (by noticing the power draw drop to zero) or hunt down those "energy vampire" electronics that silently add to your bill.
The DIY market is absolutely booming. Of the roughly 480 million smart‑home devices shipped globally in 2024, a staggering 60% were made for people like us to install ourselves. We're seeing huge growth in areas like smart lighting, which jumped by about 31% in 2023. If you want to dive deeper, you can explore more about this growing market on marketgrowthreports.com and see just how much plug-and-play tech is defining the future of our homes.
Bringing Your System to Life: Installation and Setup
Alright, this is where the magic happens. You’ve done the research, you've picked your platform, and you have a small pile of hardware sitting on your desk. Now it's time to turn that collection of boxes and circuit boards into the brain of your smart home. Let's get this thing online.
We're going to use the most common and powerful setup for our walkthrough: Home Assistant running on a Raspberry Pi. It’s the go-to for a reason—it strikes a fantastic balance between cost, power, and community support. It’s the perfect place to start.
Getting Home Assistant Up and Running
First things first, we need to install the Home Assistant Operating System (HAOS) onto a microSD card. This card will act as the hard drive for your Raspberry Pi. It sounds technical, but a few free tools make it surprisingly simple.
You'll start by grabbing the official Raspberry Pi Imager software. This little app does all the heavy lifting.
- Open the imager and select your Raspberry Pi model.
- Choose your operating system—you'll see Home Assistant right there in the list.
- Select your microSD card.
The software will download the latest version of HAOS and "flash" it to the card, which is just a fancy way of saying it’s setting everything up to boot correctly.
My Favorite Time-Saving Tip: Before you finish, use the imager’s settings to pre-configure your Wi-Fi details. Doing this now means your Pi will hop onto your network automatically the first time it boots up. It saves you from having to dig out a spare keyboard and monitor just for setup.
Once the imager is done, pop the microSD card into your Raspberry Pi, plug in the power, and walk away for a few minutes. It needs a moment to boot, run its initial setup, and download the latest updates.
To check on its progress, open a web browser on a computer on the same network and navigate to homeassistant.local:8123. When you see a welcome screen asking you to create your user account, you’re in business!
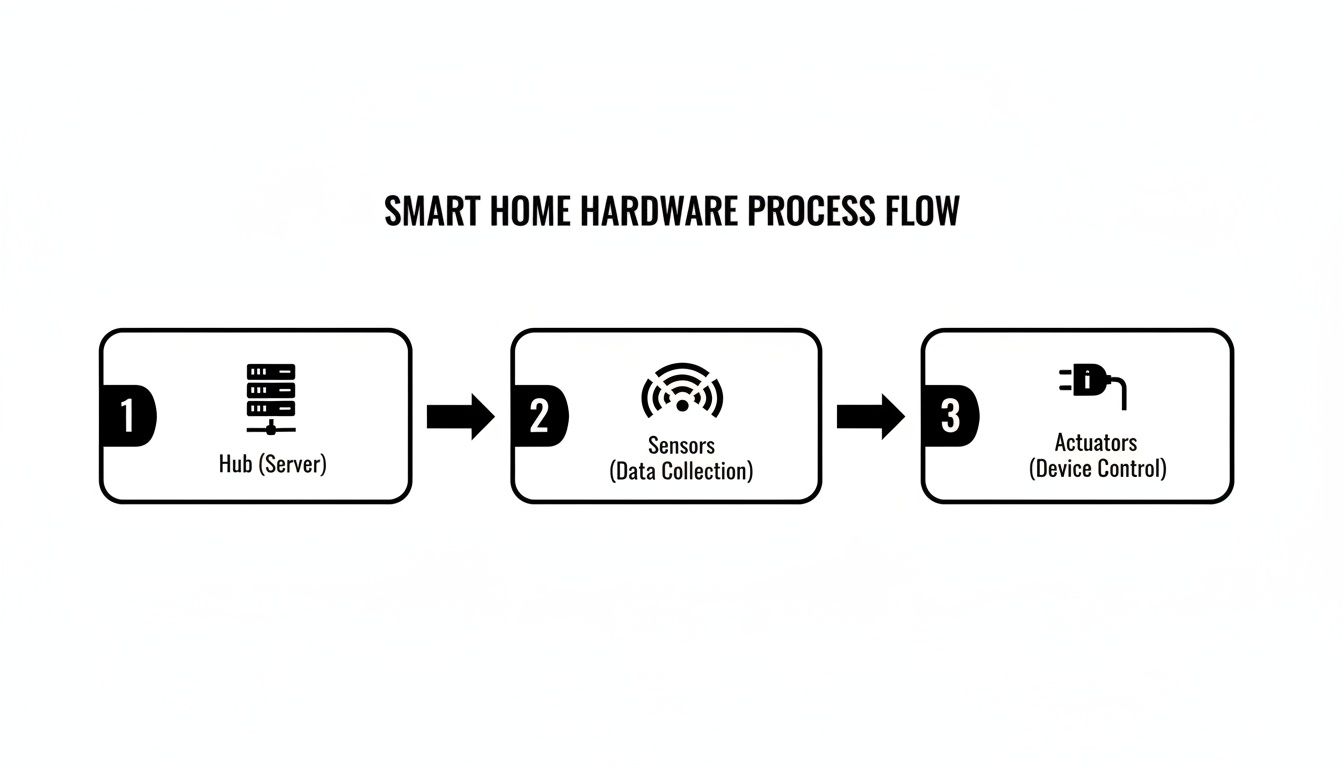
This diagram gives you a mental model of how the pieces will fit together. The hub is the central coordinator, getting information from sensors and telling actuators what to do.
Adding Your First Devices
With Home Assistant humming along, it’s time to give it some senses by connecting your smart devices. Home Assistant calls these connections integrations. You'll find it's great at automatically discovering things on your network, like a Sonos speaker or a Philips Hue bridge.
But for Zigbee or Z-Wave devices, we need to introduce them manually. Let's walk through pairing a Zigbee motion sensor—a classic first device.
First, plug your Zigbee USB stick (a popular choice is the Sonoff Dongle-P) into your Raspberry Pi.
Next, in your Home Assistant dashboard, go to Settings > Devices & Services.
- Click the Add Integration button and search for Zigbee Home Automation (ZHA).
- Home Assistant should find your USB stick automatically. Just follow the on-screen prompts to create a new Zigbee network. This is a one-time thing that sets up the communication backbone.
- Once that's done, go to the ZHA integration, click Configure, and then Add Device. Your hub is now actively listening for anything new.
- Now, grab your motion sensor and put it into pairing mode. This usually means holding a small button for a few seconds until a little LED starts blinking.
After a few moments, the new sensor will pop up in Home Assistant. Give it a useful name like "Living Room Motion" and assign it to an area. That's it! You've successfully added your first Zigbee device from scratch.
Building Your First Automation
A smart home isn't just about having connected devices; it's about making them work together without your input. This is where the real fun begins.
Let's build a classic automation: turn on the hallway light when the front door opens, but only if it's dark outside. For this, you’ll need a door sensor and a smart light bulb or switch that are already connected to Home Assistant.
We’ll use the built-in Automation Editor, which is a fantastic visual tool that doesn't require any coding.
Here’s the simple logic we're going to build:
- Trigger: The front door sensor changes from
closedtoopen. - Condition: The sun has already set.
- Action: Turn on the hallway light.
In the Automation Editor, you'll see separate sections for Trigger, Condition, and Action. You just click and select your devices from dropdown menus. Choose the door sensor as the trigger, add a "Sun" condition for "after sunset," and then pick the "turn on" service for your hallway light as the action.
Save it, and you're done. That automation will now run silently in the background, ready to react. This is the core of home automation—creating a home that anticipates your needs. You've just taken your first real step.
Creating Automations That Simplify Your Life
So, you've got all your hardware connected and communicating with your hub. You've essentially built the nervous system for your smart home. Now for the fun part: teaching it how to think.
This is where you graduate from simply using your phone as a glorified remote control. We're talking about crafting smart routines that actually make your life easier, safer, and a bit more magical. The goal is to build a DIY home automation system that anticipates what you need, handling those little repetitive tasks automatically.
It’s the difference between tapping a button to turn on a light and having the lights come on by themselves because they know you just got home and it's getting dark.
Understanding Automation Logic: Triggers, Conditions, and Actions
Every automation you can dream up, from the simplest to the most complex, boils down to three core concepts. Get your head around these, and you've unlocked the true potential of your system.
-
Trigger: This is the event that kicks everything off. It's the "if this happens…" part of the equation. A trigger can be a sensor detecting motion, a specific time of day, a door opening, or even you tapping a button on your phone.
-
Condition: These are the rules that must be met before the automation runs. Think of them as intelligent filters. For example, the trigger might be motion in the living room, but the condition is only if it's after sunset. This stops your lights from turning on unnecessarily all day.
-
Action: This is what your system actually does when the trigger fires and the conditions are met. It’s the "…then do that" part. An action could be anything from turning on a smart plug to adjusting the thermostat, playing a specific playlist, or sending a notification to your phone.
A simple way to think about it is making coffee in the morning. The trigger is your alarm going off. The condition is checking if it's a weekday. If both are true, the action is the smart plug for your coffee maker switching on. Your smart home thinks in the exact same way.
Crafting Your First Intelligent Scenes
Let’s put this logic into practice. Instead of just controlling one device, a "scene" coordinates several devices to create a specific mood or accomplish a multi-step task. These are the automations that really deliver that "wow" factor.
The "Good Morning" Scene
This routine is all about easing you into the day, replacing a blaring alarm with a much more civilized wakeup call.
- Trigger: The time hits 6:30 AM.
- Conditions: Only run if it's a weekday and your phone's location shows you're at home.
- Actions:
- Slowly fade the bedroom lamp from 1% to 60% brightness over 10 minutes.
- Nudge the thermostat up to your preferred morning temperature.
- Start playing a chill "Morning Coffee" playlist on your smart speaker at a low volume.
The "Movie Night" Mode
Forget fumbling with multiple remotes and light switches. One command is all it takes to turn your living room into a private theater.
- Trigger: You press a virtual "Movie Night" button in your Home Assistant dashboard (or use a voice command).
- Conditions: None needed for this one—when you want movie night, you want it now.
- Actions:
- Dim the main living room lights down to 15%.
- Turn off the lights completely in the adjacent kitchen and hallway.
- Power on the smart plug that controls your soundbar.
- Change the accent LED strips behind the TV to a cool, deep blue.
Building these automations is a really creative process. The best way to start is to find a small, daily annoyance and brainstorm how your connected devices could solve it.
If you're looking for a jolt of inspiration, our guide on how to automate your home is packed with dozens of other ideas. With a DIY system, the only real limit is your imagination.
Got Questions About DIY Home Automation?
Jumping into a new project always brings up a few questions, and building your own smart home is no different. Let's be honest, the world of DIY home automation systems can feel a little intimidating at first. So, let's clear up some of the most common concerns right now. Getting these practical issues sorted out will give you the confidence you need to get started.
A lot of people pump the brakes because they think it's going to cost a fortune. That's probably the biggest myth out there. The truth is, you're in complete control of the budget.
What Does a DIY System Really Cost?
This is where the DIY approach truly shines—it’s completely scalable. You can get your feet wet for a surprisingly small investment. A solid starting point is a Raspberry Pi (around $60), a good Zigbee/Z-Wave USB stick (about $40), and a couple of sensors to experiment with (maybe $15 each). All in, you’re looking at a starting cost of around $150. That’s a tiny fraction of what some off-the-shelf systems demand.
From that simple beginning, you can expand one device at a time. Add a smart plug this month, a motion sensor next month. You build it at your own pace, as your budget allows and your ideas grow, which is a huge advantage over dropping a grand on a pre-packaged kit.
My best advice? Start small. Seriously. Solve one nagging problem first—like a lamp you always forget to turn off or a door you want to monitor. That small win will give you the momentum to keep going. It's way more rewarding than trying to automate the whole house in one weekend.
Is It Actually Secure and Private?
When you set it up correctly, a local-first platform like Home Assistant is far more private than any cloud-based gadget from a big tech company. Why? Because all your data—your routines, your device status, your personal habits—stays on your network. It never leaves your house. This drastically reduces your exposure to corporate data mining and the all-too-common data breaches you read about.
Of course, with that control comes responsibility. You’re the one in charge of security. This isn't as scary as it sounds and boils down to a few smart habits:
- Use strong, unique passwords. This goes for your Home Assistant login, your Wi-Fi, everything.
- Keep your software updated. Updates often contain crucial security patches. Don't ignore them.
- Don't just open your system up to the internet. For remote access, your best bets are a secure VPN or a trusted, encrypted service like Nabu Casa for Home Assistant.
Following these basic security rules lets you build a smart home that's both powerful and truly private.
What's the Toughest Part for Beginners?
Without a doubt, the biggest hurdle for newcomers is the initial learning curve. It takes a little while for concepts like how Zigbee and Z-Wave create self-healing mesh networks to really click. And yes, you will get frustrated trying to figure out why a new sensor won't pair, only to realize it was just too far from the hub or your microwave was causing interference. It happens to everyone.
The other common trap I see is what I call "automation creep." It’s that temptation to automate absolutely everything right away. That's a fast track to burnout. Focus on one or two simple routines that solve a genuine annoyance in your day. Maybe it’s a closet light that always gets left on, or you just want a lamp to gently fade on at sunset.
Nail those small victories first. You'll learn the fundamentals and build the confidence you need to tackle the really cool, complex projects later on.
Here at Automated Home Guide, our goal is to help you through every part of your smart home journey with real-world insights and practical advice. For more detailed guides and honest product reviews, check out our full site at https://automatedhomeguide.com.


Leave a Reply