

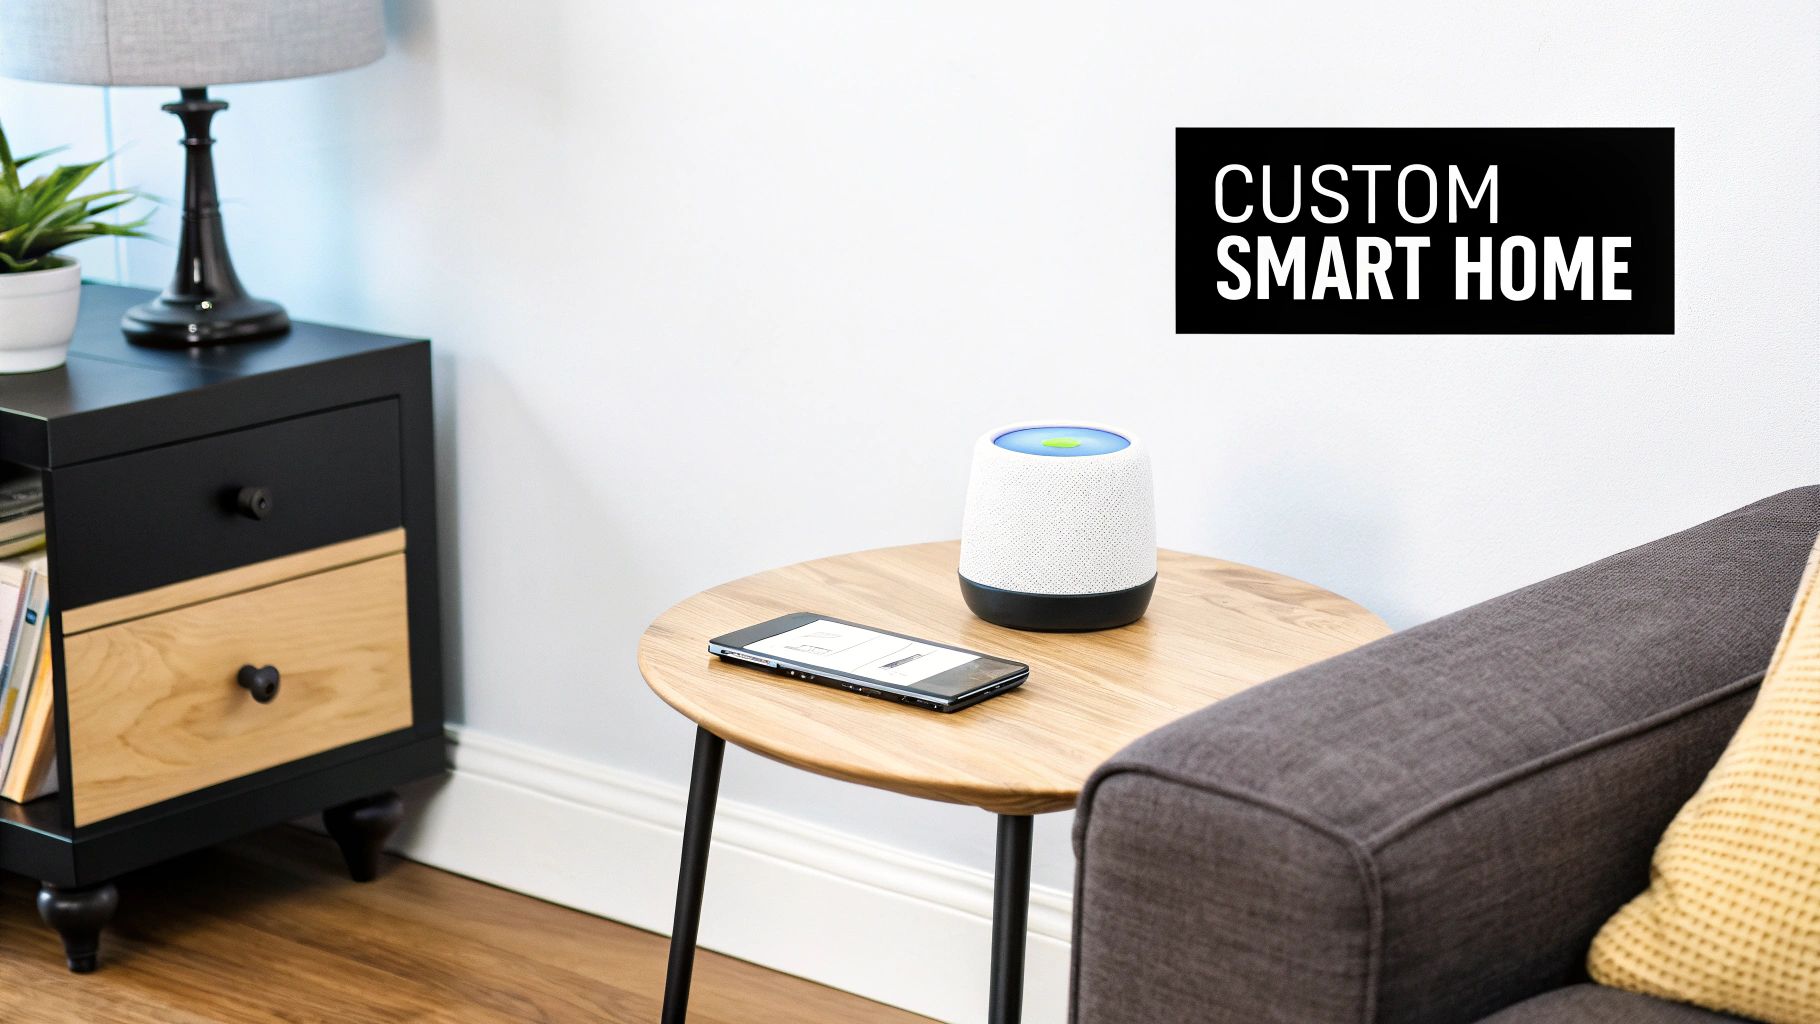
Building your own home automation system is about taking real control over your living space. We're not just talking about a few smart plugs; we're talking about creating a truly intelligent environment that works for you, on your terms. This path gives you total freedom to customize, beefs up your privacy, and saves you a ton of money in the long run compared to those subscription-based services.
Why Build Your Own Smart Home?
So, you're ready to go beyond the basic smart home starter kits? Good. Building your own system gives you a level of control and personalization that pre-packaged solutions just can't touch. You get to be the master architect, deciding exactly which devices talk to each other, how they communicate, and what rules they follow. The end result is a home that works for your life, not for a big tech company's bottom line.
This guide is here to cut through the noise and show you how to build a custom smart home from scratch. We'll cover everything, from the initial brainstorming session to flicking the switch on your first automated 'Welcome Home' scene. Forget the intimidation factor—with the right plan, creating a personalized, automated living space is totally within your reach.
The Real-World Advantages of a DIY System
Going the DIY route isn't just a fun project (though it is). It brings some serious, practical benefits that put you in the driver's seat of your home's tech.
- Ultimate Customization: Want your Z-Wave door sensor to trigger your Zigbee lights? No problem. You're in charge, so you can mix and match devices from hundreds of different brands to create the perfect setup.
- Serious Privacy and Security: When you build your system around a local-first platform like Home Assistant, your personal data stays on your network, inside your own home. This drastically reduces your reliance on external cloud servers and minimizes privacy risks.
- Long-Term Cost Savings: Sure, there's an upfront investment in hardware. But you buy it once and you own it forever. You completely avoid the recurring monthly fees that plague so many managed systems.
- Built to Last: As new gadgets and protocols hit the market, you can easily integrate them. You’re never locked into a single company’s ecosystem or forced into expensive, unnecessary upgrades.
A DIY home automation system is more than a collection of gadgets; it's a cohesive ecosystem designed by you, for you. It puts you in control, ensuring your home operates on your terms, quietly and efficiently in the background.
A Fast-Growing Movement
If you’re thinking about taking this on, you're in good company. The excitement around home automation systems DIY projects is exploding. The global market for this is expected to jump from about USD 63.4 billion in 2024 to a staggering USD 292.0 billion by 2035—that's a growth rate of nearly 15% every year. This boom is all thanks to more affordable devices and people just like you wanting to install their own smart gear. You can find more data on this trend over at marketresearchfuture.com.
This isn't just another weekend project; it's a rewarding journey that truly improves your day-to-day life. You can learn more about the specific benefits of home automation in our detailed article. The payoff is a smarter, more responsive home that actually anticipates your needs.
Creating Your Smart Home Blueprint
Before you even think about clicking “Add to Cart” on that shiny new gadget, let’s talk strategy. The single biggest mistake I see people make is buying a box of cool tech without a clear plan. That’s how you end up with a drawer full of incompatible devices and a smart home that feels, well, pretty dumb. A successful project starts with a blueprint.
First things first, ask yourself why you’re doing this. What's the main driver? Are you trying to beef up security with smart locks and cameras? Maybe you're focused on saving a few bucks on your utility bills with an intelligent thermostat and automated lighting. Or perhaps you just want the sheer convenience of your house working for you. Nailing down this core goal is your North Star—it'll guide every single decision from here on out.
Think of it this way: you wouldn't build a house without a blueprint. The same exact principle applies to creating reliable home automation systems diy.
Performing a Room-By-Room Audit
With your main objective in mind, it's time for a walkthrough. Grab a notepad or open a new note on your phone and go through your home, room by room. In each space, look for friction points. What small annoyances can you solve? What daily tasks could be a little bit easier?
This is where you turn vague ideas into an actual to-do list. Instead of a fuzzy goal like "I want smart lighting," you start to pinpoint specific, high-impact opportunities.
- Living Room: What if the lights automatically dimmed to a perfect "Movie Night" setting when you fire up the TV after 8 PM? Or how about smart blinds that close on their own as the sun sets, cutting glare and giving you some privacy?
- Kitchen: Imagine under-cabinet lights that pop on with a motion sensor when you sneak in for a midnight snack. You could even put a smart plug on the coffee maker so it starts brewing your first cup five minutes before your morning alarm even thinks about going off.
- Bedrooms: How about waking up more gently with lights that slowly brighten to mimic a natural sunrise? A simple "Goodnight" command could turn off all the lights, lock the doors, and set the thermostat to your preferred sleeping temperature.
- Entryway/Hallways: Wouldn't it be great if the lights turned on the second the front door opens after dark? It's a huge help when your hands are full of groceries and adds a nice layer of security.
Suddenly, you have a practical, prioritized list of things you actually want to accomplish.
The best automations are the ones that solve a real, everyday problem. Focus on routines that make your life smoother, safer, or more efficient. That's how you build a system you'll actually use and love.
Developing a Phased Rollout Plan
Trying to automate your entire house in one weekend is a surefire way to get frustrated and blow your budget. The smarter play is to break it down into phases. Start with a single, high-impact project. This lets you get your feet wet, learn the tech, and score a quick win that keeps you motivated.
A fantastic first project is smart lighting in one room, like your living room. It’s relatively cheap, installation is usually a breeze (especially with smart bulbs), and you see the results instantly. It's incredibly satisfying.
Here’s what a phased plan might look like in practice:
- Phase 1 (The Foundation): Get a good central hub and automate the living room lights with a few smart bulbs and a motion sensor. Your goal here is just to get comfortable with pairing devices and creating a simple scene.
- Phase 2 (Expanding Convenience): Now, bring in some smart plugs for the kitchen appliances and add a smart lock to the front door. This phase is all about integrating different types of devices and playing with time-based routines.
- Phase 3 (Energy Management): Install a smart thermostat. Then, add some door and window sensors so your AC isn't trying to cool the whole neighborhood when a window is left open. Here, you’re building more complex automations that actually save you money.
This strategic approach ensures your home automation systems diy grows in a way that makes sense. You won't get overwhelmed, and you can spread the cost out over time. By starting small and building on your successes, you’ll end up with a powerful, cohesive system instead of a frustrating pile of disconnected gadgets. This planning is the bedrock of a truly smart home.
Choosing Your Core Technology and Hardware
Alright, with your blueprint in hand, it's time to start picking the actual building blocks for your system. This is the exciting part where your home automation systems diy project starts to feel real. We’ll look at two crucial pieces: the central hub that will act as the brain, and the communication protocols—the languages your different devices will use to talk to each other.
Getting this right from the start is absolutely critical. You're not just picking gadgets; you're building a cohesive ecosystem that needs to be reliable, responsive, and ready for whatever you throw at it down the road. The foundation you lay now directly impacts how easily you can expand and add new devices later.
This decision tree can give you a great visual starting point based on what you're trying to achieve, whether that's beefing up security, saving on energy bills, or just adding a layer of convenience to your life.
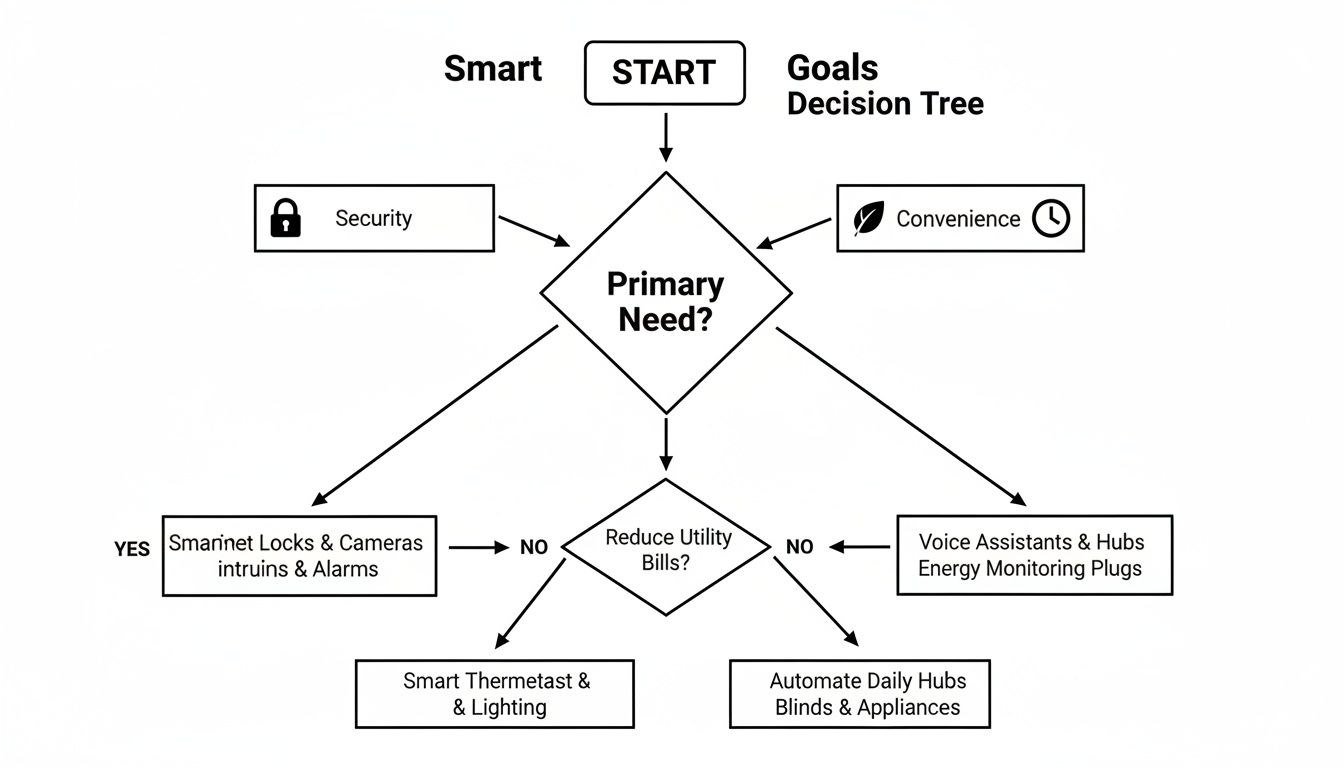
Think of this as a way to clarify your priorities. If security is your main goal, smart locks are your first stop. If you're focused on convenience, smart plugs might be the best place to begin. It's all about picking hardware that solves your biggest needs first.
The Great Protocol Debate: Wi-Fi vs. Zigbee vs. Z-Wave
Every single smart device needs a way to communicate, and the protocol you choose will have a massive impact on your system's performance, reliability, and even the battery life of your sensors. While most people are familiar with Wi-Fi, it isn't always the best tool for this job.
Let's break down the main contenders.
When it comes to choosing the right protocol for your home automation setup, understanding the strengths and weaknesses of each option is key. Wi-Fi offers convenience, but Zigbee and Z-Wave were built specifically for this kind of work, providing reliability and efficiency that Wi-Fi often can't match.
Comparing Smart Home Communication Protocols
| Protocol | Pros | Cons | Best For |
|---|---|---|---|
| Wi-Fi | Ubiquitous, no hub needed for many devices, high bandwidth. | Power-hungry (bad for batteries), can congest your home network. | Security cameras, smart speakers, and other high-data devices. |
| Zigbee | Low power consumption, fast response times, strong mesh network extends range. | Can experience interference from Wi-Fi (both use the 2.4 GHz band). | Lighting, motion/contact sensors, and general-purpose smart home devices. |
| Z-Wave | Extremely reliable mesh network, uses a separate frequency (no Wi-Fi interference). | Slightly slower than Zigbee, can be more expensive. | Critical systems: door locks, garage door openers, security sensors. |
Ultimately, the best approach is often a hybrid one. A good hub will support multiple protocols, allowing you to use the best technology for each specific task.
From my own experience, a mix-and-match strategy works wonders. I rely on Z-Wave for mission-critical things where reliability is non-negotiable, like my front door lock and garage. I use Zigbee for its speed and affordability with most of my lighting and battery-powered sensors. Wi-Fi is strictly for things that need serious bandwidth, like my security cameras.
For a much deeper dive into the technical side of things, our complete guide on smart home protocols can help you figure out the perfect fit for your home's layout and your specific goals.
Must-Have Hardware Categories for Your DIY System
Once you've landed on your primary protocols, you can start picking out the "senses and hands" for your new smart home. My advice? Start with a few high-impact devices that give you an immediate and tangible benefit.
Core Device Types To Start With
- Smart Switches and Dimmers: Honestly, this is one of the most powerful upgrades you can make. Replacing a standard light switch gives you automated control over entire light fixtures and ceiling fans, not just one bulb at a time.
- Motion and Contact Sensors: These are the eyes and ears of your automated home. A simple contact sensor on your front door can trigger a "Welcome Home" scene, while a motion sensor in a hallway can gently turn on lights for you during a late-night trip to the kitchen.
- Smart Plugs: This is the easiest entry point for anyone. They can make almost any "dumb" appliance with a physical on/off switch—like a lamp, a fan, or even a coffee maker—instantly smart.
- Environmental Monitors: These little gadgets track temperature, humidity, and sometimes even air quality. They're the key to creating truly smart automations that can manage your thermostat or kick on a dehumidifier when needed.
As you select your core hardware, don't be afraid to think bigger. For instance, incorporating something like motorised skylight blinds with smart home integration early on can unlock some seriously cool automations, like having them close automatically during the hottest part of the day to save on cooling costs.
This strategic approach to building a system is a huge reason why the DIY market is booming. Market analysis shows that DIY solutions are set to grow at an incredible 18.5% CAGR, far outpacing the professionally installed segment. People are realizing that affordable devices and better standards have made it easier than ever to build a custom system. You're not just taking on a weekend project; you're joining a massive consumer movement.
With your hardware plan mapped out, it's time to pick the software that will be the brain of your entire smart home. This is a big decision. It determines how you'll control your devices, how they'll work together, and, crucially, who has access to your data. Think of it as choosing the command center for your home automation systems diy setup.
You're essentially choosing between two core philosophies: a locally-controlled, open-source platform or a more plug-and-play, cloud-based system. Each has its own set of pros and cons, particularly when it comes to privacy, flexibility, and just how much you want to tinker.
Taking the Reins with Local, Open-Source Software
If you're after complete control and top-tier privacy, you can't beat open-source platforms like Home Assistant. You install this software on a small, dedicated computer right in your house—something like a Raspberry Pi works great. This means everything runs on your own network. Your automations fire off from a device you own, not some server farm a thousand miles away.
This "local-first" way of doing things has some massive advantages:
- Your Data is Yours: No third-party company is sifting through your smart home data. What happens in your house, stays in your house.
- Rock-Solid Reliability: Is the internet out? No problem. Your lights will still turn on at sunset, and your morning routine will still run.
- Limitless Flexibility: Thanks to a huge and active community, you can connect almost any smart device you can think of, no matter the brand.
So, what's the catch? It's a bit of a steeper learning curve. Home Assistant is incredibly powerful, but it does require more hands-on setup. For those of us who prioritize customization and want to own our data, though, that initial time investment is a small price to pay.
Going with a local platform like Home Assistant is a conscious choice to own your smart home, not just rent it from a corporation. You're putting the system's brain under your own roof, freeing yourself from remote servers and potential subscription fees.
The Simpler Route: Cloud-Based Hubs
The alternative is the world of user-friendly, often proprietary hubs that lean on cloud services. These systems are built for simplicity and are a fantastic entry point if you're just getting started. The setup is usually quick, and the apps are slick and polished.
But that convenience comes with trade-offs. Your automations are completely dependent on your internet connection. If the company's servers go down, your smart home can suddenly become pretty dumb. That’s a serious point to consider if you're trying to build a resilient and reliable system.
Gearing Up with the Right Physical Tools
Software is just one piece of the puzzle. To actually install devices like smart switches or in-wall outlets, you’ll need a few physical tools. You don't need a professional-grade workshop, but having these basics on hand will make the job infinitely safer and less frustrating.
Your must-have toolkit includes:
- Multimeter: This is your most important safety tool, bar none. It's the only way to be 100% certain the power is off before you start touching wires.
- Wire Strippers/Cutters: You'll need these to cleanly strip insulation and trim wires for a solid, safe connection.
- Screwdriver Set: A decent set with various sizes of Phillips and flathead screwdrivers is essential for opening switch boxes and mounting devices.
- Voltage Tester: A non-contact "voltage pen" is a great secondary tool. It gives you a quick, at-a-glance check to see if a circuit is live without having to make direct contact.
Safety First, Last, and Always
Whenever your home automation systems diy project involves your home’s main electrical wiring, safety has to be your number one priority. The golden rule is simple: Always kill the power at the circuit breaker before you do anything else.
After you've flipped the breaker, use your multimeter and voltage tester to confirm the circuit is dead. Seriously, double-check. This simple step takes five seconds and is the single most important thing you can do to avoid getting hurt. If you feel even the slightest bit unsure about what you're doing, stop and call a licensed electrician. No smart home project is worth risking your safety.
Bringing Your Smart Home to Life

Okay, you've done the planning and the boxes of new gear have arrived. This is where we move from theory to practice and your home automation systems diy project really starts to feel real. It's time to turn that collection of hardware into a truly intelligent, responsive environment.
That first successful installation is always the most rewarding part. It’s tangible proof that your vision is coming together, and trust me, seeing a device respond to your command for the first time is a genuinely cool moment. Let's get our hands dirty with two foundational projects that pack a big punch.
Installing Your First Smart Switch
Upgrading a regular light switch to a smart one is an absolute game-changer. Why a switch instead of just a smart bulb? A smart switch controls the entire light fixture, even ones with multiple bulbs, and it never loses power. That means you avoid the classic problem of someone flipping the physical switch off and making your smart bulb "unresponsive."
Here’s a quick rundown of what the process looks like:
- Safety First. Always. Head to your breaker box and kill the power to the circuit you're working on. Don't guess—use a non-contact voltage tester to be 100% sure the power is off before you touch a single wire.
- Say Goodbye to the Old Switch. Unscrew the faceplate, then remove the screws holding the switch in the wall box. Gently pull it out and snap a quick photo of the wiring. This picture is your best friend. You'll typically see a hot (usually black), load (also often black), neutral (white), and ground (bare copper or green) wire.
- Wire Up the New Switch. Following the manufacturer's diagram, connect the wires to your new smart switch with the included wire nuts. The most common snag people hit is the neutral wire; most smart switches need it to stay powered on. Older homes sometimes don't have one in the switch box. If that's you, don't sweat it. Our guide covers how to install a https://automatedhomeguide.com/wifi-light-switch-no-neutral/ safely.
- Tuck It In and Test. Carefully push the new switch and wiring back into the box, screw it into place, and pop on the new faceplate. Now for the moment of truth: flip the breaker back on and test the switch, both by tapping it and through its app.
The real magic here isn't just turning a light on with your phone. A smart switch is a gateway to true automation. Now that fixture can react to a motion sensor, a door opening, or the time of day—something a smart bulb alone can't do reliably.
Pairing a New Zigbee Sensor
With your switch online, let's add some sensory input. Pairing a Zigbee door sensor is a perfect example of how easy it is to expand your system, and the best part? No electrical work involved.
First, open your smart hub's app—whether that's Home Assistant, Hubitat, or something else—and find the section for adding a new device. You'll want to put the hub into "pairing" or "discovery" mode.
Next, just pull the plastic battery tab on your new sensor. The device will wake up and start looking for a hub to talk to. Within a few seconds, your hub should see it and add it to your network. Just give it a descriptive name like "Front Door Sensor," assign it to a room, and you're done. You now have a new set of digital eyes on your home.
Crafting Powerful Automations and Scenes
This is where the real fun begins. With devices installed and talking to your hub, you can start building the "if-then" logic that makes your home truly smart.
Automations are the workhorses, running in the background. Scenes, on the other hand, are pre-set conditions you can launch with a single command. Think of it this way: a "Good Morning" routine is an automation that runs on a schedule, while "Movie Night" is a scene you trigger on demand.
Let’s build out a couple of popular routines that show what's possible.
Example 1: The "Good Morning" Routine
This is all about waking up gradually and getting the information you need, without a blaring alarm.
- Trigger: Weekdays at 6:30 AM.
- Actions:
- The bedroom lamp slowly brightens from 1% to 60% over 10 minutes.
- Your smart thermostat nudges the temperature up from its overnight setting.
- A smart speaker quietly reads you the day's weather forecast and your first calendar appointment.
Example 2: The "Movie Night" Scene
With a single voice command, you can create the perfect viewing atmosphere instantly.
- Trigger: Voice command, "Hey Google, it's movie time."
- Actions:
- Living room lights dim down to a warm 15% brightness.
- The smart plug connected to your TV and soundbar turns on.
- If you have them, smart blinds automatically lower to eliminate screen glare.
Beyond just comfort, you can also focus on efficiency by setting smart energy management rules for things like battery storage or high-draw appliances.
These examples are just a starting point. The best approach is to begin with simple, useful routines that solve a small, everyday annoyance. As you get more comfortable, you can build more complex automations that make your home a genuinely helpful partner in your daily life.
Got Questions About Your DIY Smart Home? We've Got Answers.
As you dive into your DIY home automation project, you're bound to hit a few head-scratchers. That's not just normal; it's part of the process. I've been there myself. Let's walk through some of the most common questions that pop up, so you can keep your project moving forward with confidence.
Think of this as your go-to guide for those "wait, what about…?" moments.
Do I Really Need a Smart Hub?
Honestly, it depends on your goal. If you're just dipping your toes in with a few Wi-Fi smart plugs from the same brand, you can probably get by with their app. But if you're serious about building a reliable, integrated smart home, a central hub is non-negotiable.
This is where the real magic happens. Hubs that speak Zigbee and Z-Wave let you break free from relying on the internet for every little thing. They create a local network in your home, allowing devices from dozens of different brands to talk to each other directly. This means your "lights on at sunset" routine will work flawlessly even if your internet goes down. That’s a huge win for reliability. A platform like Home Assistant or Hubitat becomes the brain of your entire operation, tying everything together seamlessly.
What's the Best First Project for a Beginner?
Smart lighting, hands down. It's the undisputed champion for anyone starting out.
Why? It hits that perfect sweet spot of being low-risk, requiring minimal (if any) electrical work, and giving you an immediate, satisfying result you can see and use right away. You can start playing with schedules, creating "movie night" scenes, and using voice commands almost instantly. It's a quick win that teaches you the core concepts of automation and builds the confidence you need to tackle bigger things.
While a smart lock or security camera is a great goal, they're more complex to install and have higher stakes if things go wrong. Get comfortable with your lights first, then expand from there.
The whole point of a first project is to get a quick, satisfying win. Smart lighting delivers that perfectly, giving you instant gratification and a solid foundation of knowledge to build on.
Can I Mix and Match Smart Devices From Different Brands?
Absolutely! In fact, that's one of the biggest advantages of building your own home automation systems diy setup. A powerful central hub acts as a universal translator, letting you make devices that speak different "languages" work together in perfect harmony.
For example, your hub can take a signal from a Z-Wave door sensor and use it to tell a Zigbee light bulb to turn on. It's that simple. The emerging Matter protocol is set to make this even more seamless, but the core idea is the same: a good hub frees you from being stuck in one company's walled garden. You get the freedom to pick the best device for the job, no matter who makes it.
What Are the Biggest Security Risks, and How Can I Avoid Them?
The biggest vulnerabilities in any smart home are almost always unauthorized network access and insecure devices with default settings. The good news is, you can lock things down tight with a few smart habits.
First thing's first: change the default administrator passwords on your router and every single smart device you install. This is the #1 vulnerability people overlook.
Key Security Best Practices
Here’s a practical checklist to make your smart home a fortress:
- Create a Separate Network: Use your router's "guest network" feature or, if you're more advanced, set up a VLAN just for your IoT gadgets. This isolates them from your personal computers and sensitive files. If someone were to compromise a smart bulb, they wouldn't be able to see your laptop.
- Keep Everything Updated: Make a habit of checking for firmware updates for your devices and software updates for your hub. These aren't just for new features; they often contain critical security patches that plug newly discovered holes.
- Prioritize Local Control: Whenever you have the choice, go with platforms and devices that don't rely on the cloud. Keeping your data and commands inside your own home drastically reduces your exposure to company data breaches and privacy issues.
- Use Strong, Unique Passwords: Don't reuse passwords. It's a pain to remember them all, so get a password manager. It will help you generate and store ridiculously complex credentials for every account, which is a massive security upgrade.
Building these habits from day one creates a layered defense that makes your system far more resilient. It's all about being proactive, not reactive, when it comes to protecting your digital and physical world.
At Automated Home Guide, we're committed to giving you the knowledge and tools to build a smarter, safer, and more efficient home. Explore our in-depth articles and reviews to continue your DIY journey. Find out more on our website.


Leave a Reply